Side Awning installation guide
Summary
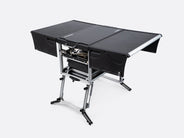
The TentBox Side Awning is the perfect way to complete your camping trip, it offers shelter from the rain and protects you from the sun.
Installing it only takes a few minutes and can be attached directly onto cross bars, raised roof rails, or the accessory rail on the TentBox Cargo.
Check out our installation video below, as well as our step-by-step written guide.
Video guide
Installing your brackets
Universal Awning Brackets
The Universal Awning Brackets include:

The L-Brackets have 4 holes. The holes that you choose will depend on your setup.
You need to make sure that there is enough clearance between the edge of your cross bar and the Side Awning once installed.
Installing to roof bars
- Place two rectangular plates on top of your roof bar.
- With the shorter side of the L-plate facing upwards, drop two long bolts into two of the holes, making sure there will be enough clearance between the edge of your roof bars and your Side Awning.
- Do this with a second L bracket, then simply drop the bolts through the metal rectangular plates that are resting on your roof bar.
- To create the clamp, take two more rectangular plates and place them onto end of the bolts underneath your roof bar, parallel to the rectangular plates above the cross bar.
- Loosely thread the nuts onto the four bolts by hand to keep the configuration in place.
- Repeat this process on your other roof bar.
- When you’re happy with the positioning of the brackets, tighten the nuts and bolts with a spanner to secure. We recommend using two spanners – one to hold the head of the bolt at the top, and the other to tighten the nut at the bottom.
-
It’s also a good idea to tighten each nut a little bit at a time to make sure the bottom plate clamps to the roof bar at a flat angle.
- Take one of the L brackets and drop two long bolts down through the holes. Then, with the short side of the bracket facing upwards, rest it on top of your roof rail.
- Take one of your metal rectangular plates, place it underneath the rail and connect to the bolts.
- You can then apply the nuts and tighten with a spanner until the bracket is securely clamped to your roof rail.
- Repeat this process for the three other L-plates, ensuring they are spread with equal distance along your roof rail to distribute the weight of the Side Awning evenly.
Cargo Awning Brackets
The Cargo Awning Brackets include:

There are two variations of the Cargo Awning Brackets: curved and angled. The type you need will depend on your version of the TentBox Cargo, and you can work this out by looking at the bottom shell to see if it looks curved or angled.
If you're having trouble working out which version you require, please send us a message with a photo of your Cargo and we would be happy to help
- Slide four bolts into the bottom accessory rail on your Cargo and four along the top rail – you’ll need to end up with four on each end.
- Slot the two brackets onto the exposed bolts and slide them along the rail to get them into a good position.
- You’ll notice the brackets have larger holes on one side than the other – these are to accommodate the large M8 bolts. Make sure the side with the bigger holes sits against the accessory rail.
- We recommend having the brackets around 30cm from either end to ensure the weight of the Side Awning is distributed safely.
- Once you're happy with the position of the brackets, you can secure them in place using the nuts provided and tighten with a spanner.
Attaching your Side Awning
- Once your brackets are attached, take your Side Awning and flip it over to expose the rail. Slide four bolts onto the top rail, and four bolts onto the bottom rail.
- Once all 8 bolts are on, slide them along the rails so they line up with the position of your bracketing system.
- Using the help of another person, lift the Side Awning into place, ensuring all the bolts are slotted into the brackets.
- With your helper holding the awning, apply the nuts onto the bolts and tighten them with a spanner to secure.
Setting up your Side Awning
- Unzip the cover.
- Roll out the Side Awning fabric to its full length.
- Fold down the legs and adjust them to achieve the height of your setup.
- You can loosen the legs by twisting them, pull out to desired length then twist them into opposite position to lock into place.
- Swing out the arms and extend them to slot into the holes on the end of the side awning.
- Use the same twisting motion to tight these to their final position.
- Use the velcro straps to attach the fabric canopy to the extended arms.
Using your Side Awning
- Set the awning at an angle if rain is expected.
- Avoid using the awning in strong winds.
- Do not leave the awning unattended when in use.

